Here we go with part two of my crochet hexagon tutorial. This part follows directly on from part one HERE
Once again it is written in U.S. terms
So , to frame the cute hexagon you made in part one I designed this pattern......

It starts with a chain round as this helps maintain the shape of the, oh so pretty, interior hexagon .
Round 5(chain round)
Attach a new colour with a slip stitch in any 2 chain space.Chain 3 .......


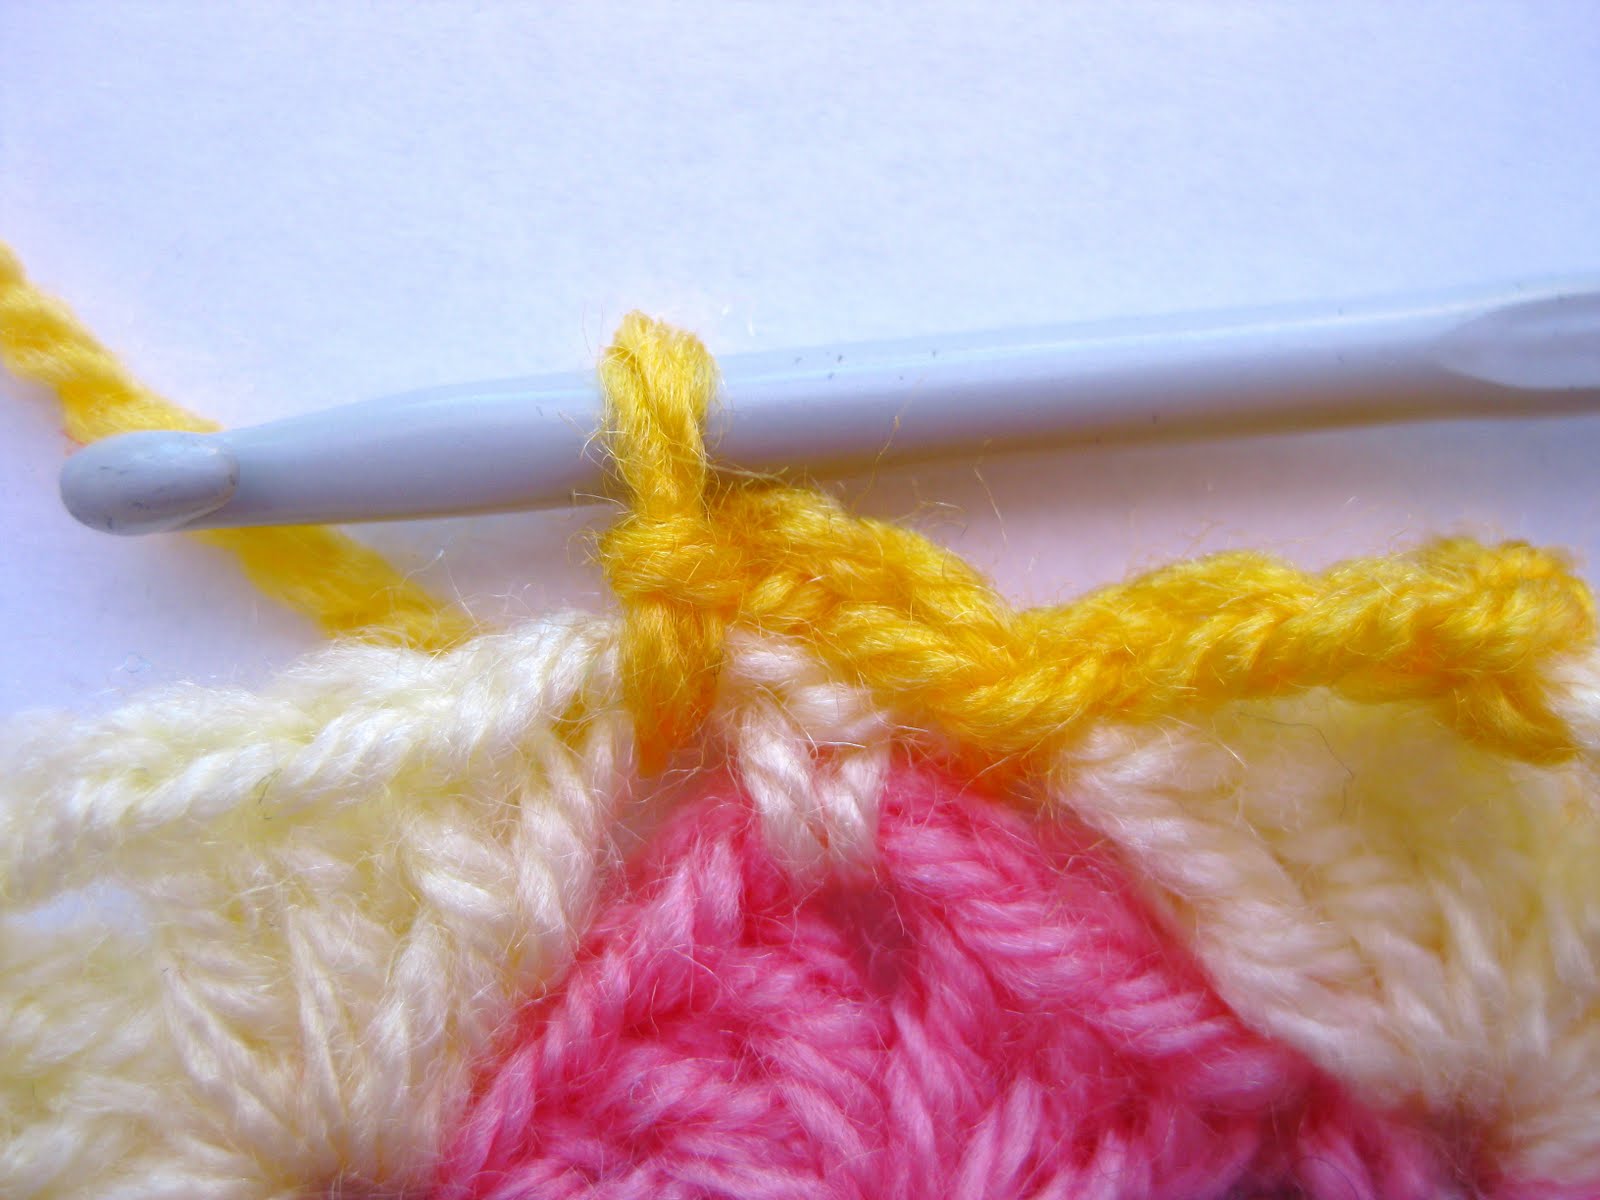
Continue around in same pattern ( 3 chains over 3D.C. and 2 chains over 1S.C. )

Once you get all the way around slip stitch through first chain 3

It should look like this............

Chain 3 and make 3 D.C. all into first 3 chain loop of round 5 (counts as 4 D.C. )........


Continue around. Each of the six sides is made up of 11 D.C. ( 4/3/4 ) with 1 chain at the corner....

Once you have gone all the way around slip stitch into first D.C. and finish off..........

Hurray ! you have completed a Hexagon motif :0)......these may be sewn together when you have enough for your chosen project ....

However ..... I'm a big fan of the join as you go method . So I've taken some pictures of this method to help you give it a try . Lucy has described this beautifully HERE but I'll try and show you on this hexagon.
So...after you have completed your first motif as described above , subsequent motifs are joined at round 6.
In the example below I was joining to 2 hexagons so I made 4 sides as I explained then I started the 5th side like this .....
Insert hook through corner of motif you wish to join to as shown...........

Yarn over hook and pull loop to front of work.....

Slip stitch .......

Make 4 D.C. and slip stitch through joining motif in the same way . 3 D.C.. .Slip stitch through motif . 4 D.C.


Make final side in same way as 5th. and slip stitch into first D.C. to finish off....


Here's what my blanket looks like today..........

Not a deal of progress ,I've been too busy playing with other projects :0) You can see I have made some more hexagons ready to join and I've been very good and sewn all their ends in securely already !
Do please let me know if any of this is unclear or I have made any mistakes .
ENJOY :0)
Jacquie x
That looks wonderful! Also many thanx on the joining tuto! Joining squares and hexagons is tough!
ReplyDeleteEsther.
Jackie, I promise the next project I finish will leave room for this one... these hexagons are so absolutely beautiful and different! I love it :)
ReplyDeletexx
It's looking beautiful Jacquie, such a labour of love. Thank you for your endless patience in doing your brilliant tutorials xox Have a fab weekend xox
ReplyDeleteSuch bright and fresh colors. Hexagons look amazing! Thank you for this wonderful tutorial!
ReplyDeletePretty, pretty, pretty! I love the design that results from round 6...it's all so pretty when joined together. I've finally mastered the join as you go technique and am working on a project with a different hex pattern...but I already made one of these and am thinking about what I'd like to do with this one! Thanks for sharing all of it with us! x&o, Annette
ReplyDeleteThanks for these tutorials, will definitely be back, yarn in hand, ready to have a go. The hexagons look quite big, you'll finish this blanket in no time!
ReplyDeleteThat's fantastic! I have saved your link for part 1... I am wondering did you put a link to part 2 on part 1? I have so many projects on the go and am smitten with my new wool at the minute but I have a handful of hexie centres made and 1 complete one so I will be getting back to that soon. xxx
ReplyDeleteFabulous tute! Wish I was good at crochet!
ReplyDeleteVery nice tutorial :)
ReplyDeleteWoooooow that looks so pretty! :D I swear, one of these days I will find the time to make a blanket of my own :) I have nothing but respect for all the gals who actually finish their blankies! :)
ReplyDeleteYour hexie's are gorgeous - 'sigh' I will learn to crochet one day!!!
ReplyDeleteBrilliant, thank you x
ReplyDeleteYou have just made the join as you go method so simple! I've always avoided it because it made no sense to me, but with your photos I get it now! Thanks so much! I enjoy reading your blog so much!
ReplyDeleteThanks for the joining tutorial - I was getting thoroughly confused trying to read someone's instructions and your photos and instructions made it so simple!
ReplyDeleteVery pretty and above all very helpful. Always wanted to try these buggers. Now I can actually start.
ReplyDeleteVery helpful tutorial. I am a novice but found your instructions very clear and helpful. One thing I was wondering.... what about if I wanted to make my hexagon bigger than 4 rounds?
ReplyDelete