Hello Lovelies,
Wooo Hooo , or should that be To-Whit to Wooo Hooo :0) It's a Happy Happy tutorial day!
I simply LOVE these cute fellas and as you can see I've got rather carried away making them in lots of different colours.They are very easy to make and so jolly .
I've seen a few similar cute crochet owls out there in blogland and on Etsy but they looked quite complicated to me.
So for my version I've tried to keep things as simple as possible. Hopefully you lovelies will easily be able to enjoy making a colourful crochet Owl.......and who could resist :0)
If you are proficient at crochet you will be able to make one of these sweet little owls in no time at all. But if you are less confident do not worry. I've taken loads of pictures to illustrate each step so do give it a go.
This item is designed for decorative use and is not suitable for use as a toy for a small child.
The pattern is written in my usual format.....U.S. terms.
Here is a list of the abbreviations used and a handy conversion guide for U.K. terms..........
sc= single crochet................................U.K. double crochet
hdc = half double crochet..................U.K. half treble crochet
dc = double crochet................................U.K. treble crochet
And they are the only stitches you need to know for this project.....is that O.K ? good ......lets get started then :0)
I've used double knitting ( worsted weight ) yarn .....it's my usual Stylecraft.........but you can use any weight with the appropriate hook size.......... gauge is not important.
The centre of your owl is made out of a modified sunburst granny circle , super easy to do and one of my favourite crochet motifs.
To begin chain 4
Then slip stitch into the first chain to form a ring........
ROUND 1 Chain 3 (counts as 1 dc) then find the middle of the ring ,can you see it in the photo, it's pretty small but it will open up as you work........
Work 13 dc into ring
and slip stitch into top of initial 3 chain . Fasten off.
ROUND 2 the next 2 rounds are worked
between the stitches of round 1.
In this picture I've inserted my needle into the space used to work
into a stitch ( there are 2 strands of yarn above the needle and 1 below)
In this photo I've inserted my needle into the space used when working
between stitches ( there are 3 strands of yarn above the needle ) This is where you need to be working for rounds 2 and 3
So
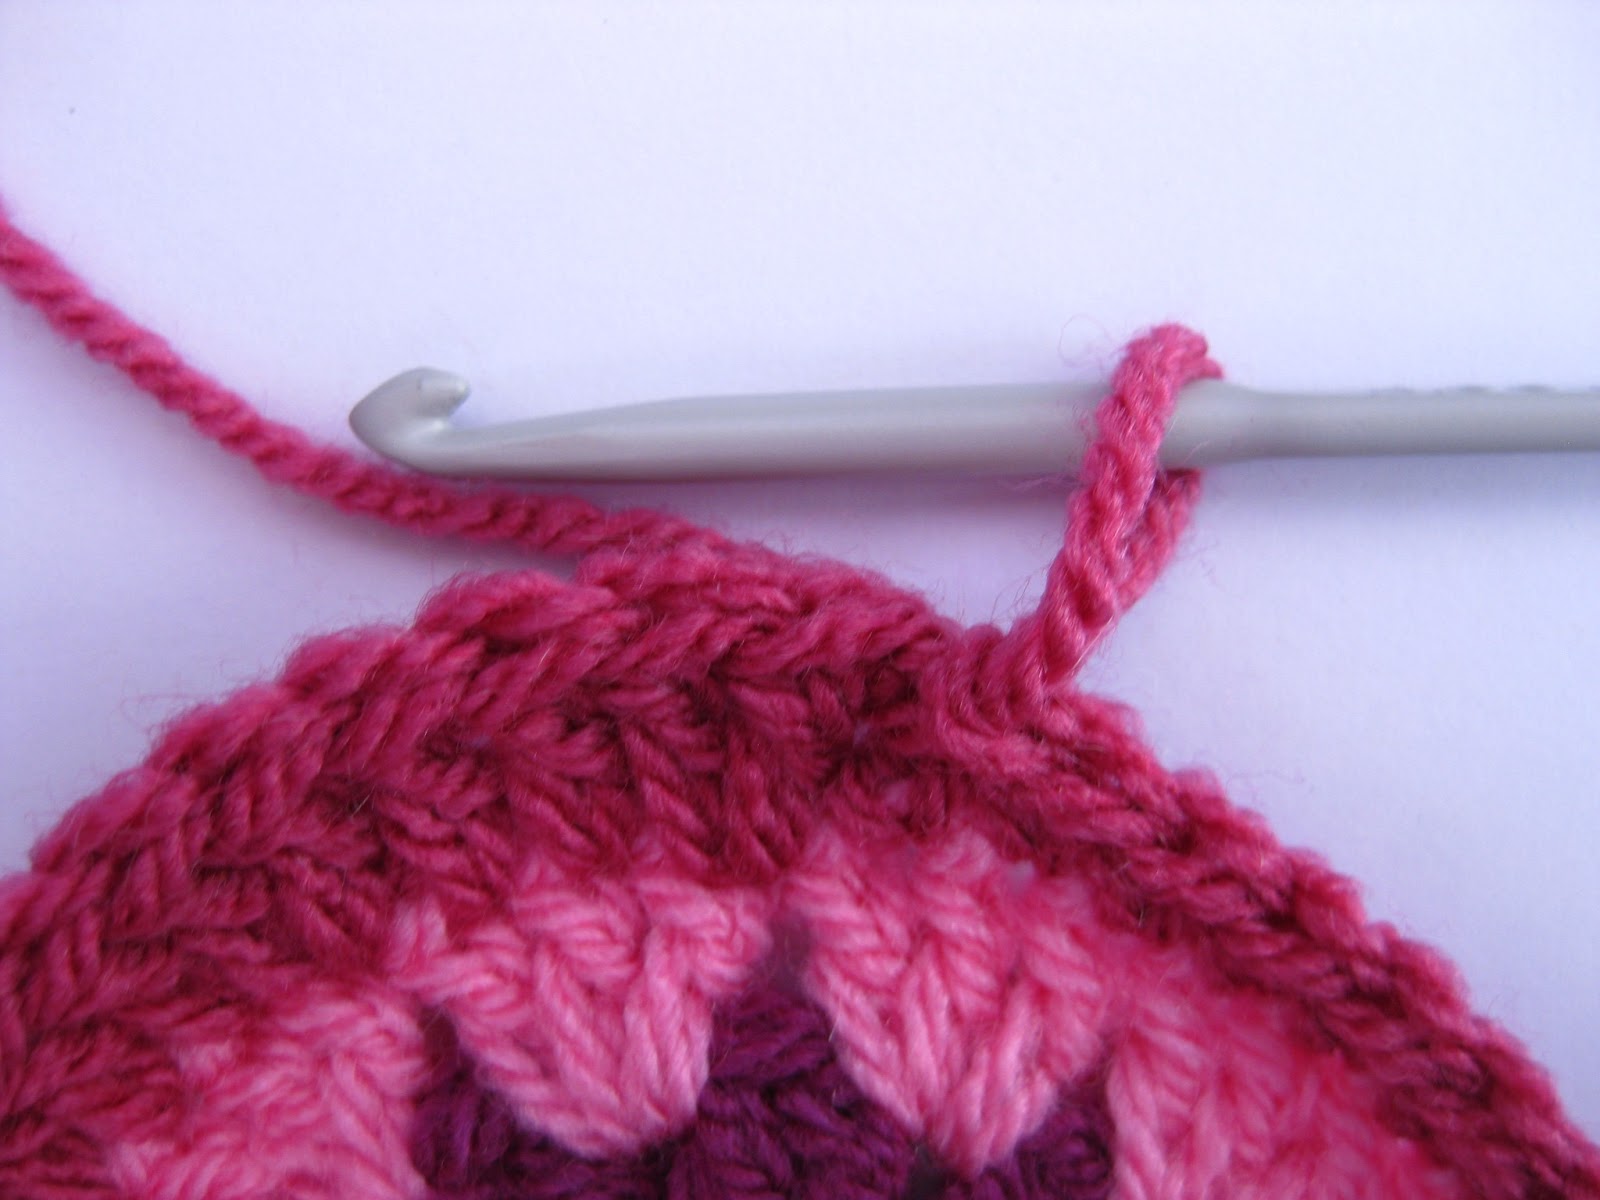
, between the stitches of round 1slip stitch to join a new colour and chain 3 (counts as 1 dc ) , work 1 dc into the same space.
Continue around , working 2 dc into each space so you end up with a total of 28 stitches ( 14 two dc clusters ) slip stitch into top of initial 3 chain and fasten off.
ROUND 3 for this round attach a new colour in any space between the 2 dc clusters of round 2 and chain 3 ( counts as 1 dc). work 2 further dc into the same space
then work 3 dc into each space around.
In this photo I'm showing how I catch the tail of yarn under my work as I go. I don't do this for blankets as it's not as secure as weaving in , but for a decorative item it's a great time saver..........
here's what your circle should look like now. You should have 14 three dc clusters, then slip stitch to initial 3 chain and fasten off..........
and here's the back. Some of the tails I have crocheted over can simply be snipped off , others will need weaving in with a needle.
Crocheting over the initial centre tail allows you to pull the centre tightly closed so no stuffing shows through.
I always weave this end in securely too.
Next make another circle for the owls back. You can use any colours you like , or just one colour. I chose to use the same colours as the front, just in a different order. That way they co-ordinate and if you prefer the second circle you can use that for the front instead :0).........
ROUND 4 in this round we will start to shape the owls head. The stitches of this round are worked
into the stitches of round 3 ......I'm showing with my needle where your hook needs to go in this picture......
Attach a new colour using a slip stitch and chain 2.
NOTE the picture shows the wrong stitch to join into! sorry about that . You need to join between the clusters
i.e one stitch to the left of the one shown....
in the next stitch make 2 dc
make 1 dc in each of the next 2 stitches, then 2 dc in the next stitch......
1 dc in each of next two stitches , then 2 dc in next stitch. 1 hdc in next stitch then 1 sc in each remaining stitch around..........
Slip stitch into initial 2 chain ......
ROUND 5 chain 1 and work 2 dc in next stitch.......
1 dc in next stitch.......
1 hdc in next stitch, 1 sc in each of next 3 stitches.......
1 hdc in next stitch, 1 dc in next and 2 dc in next.........
then in the next stitch make 1 hdc, chain 1 then slip stitch into next stitch. Fasten off......
Repeat rounds 4 and 5 on the other circle. On the second side leave a long tail to use for joining..........
Right we are getting there now.
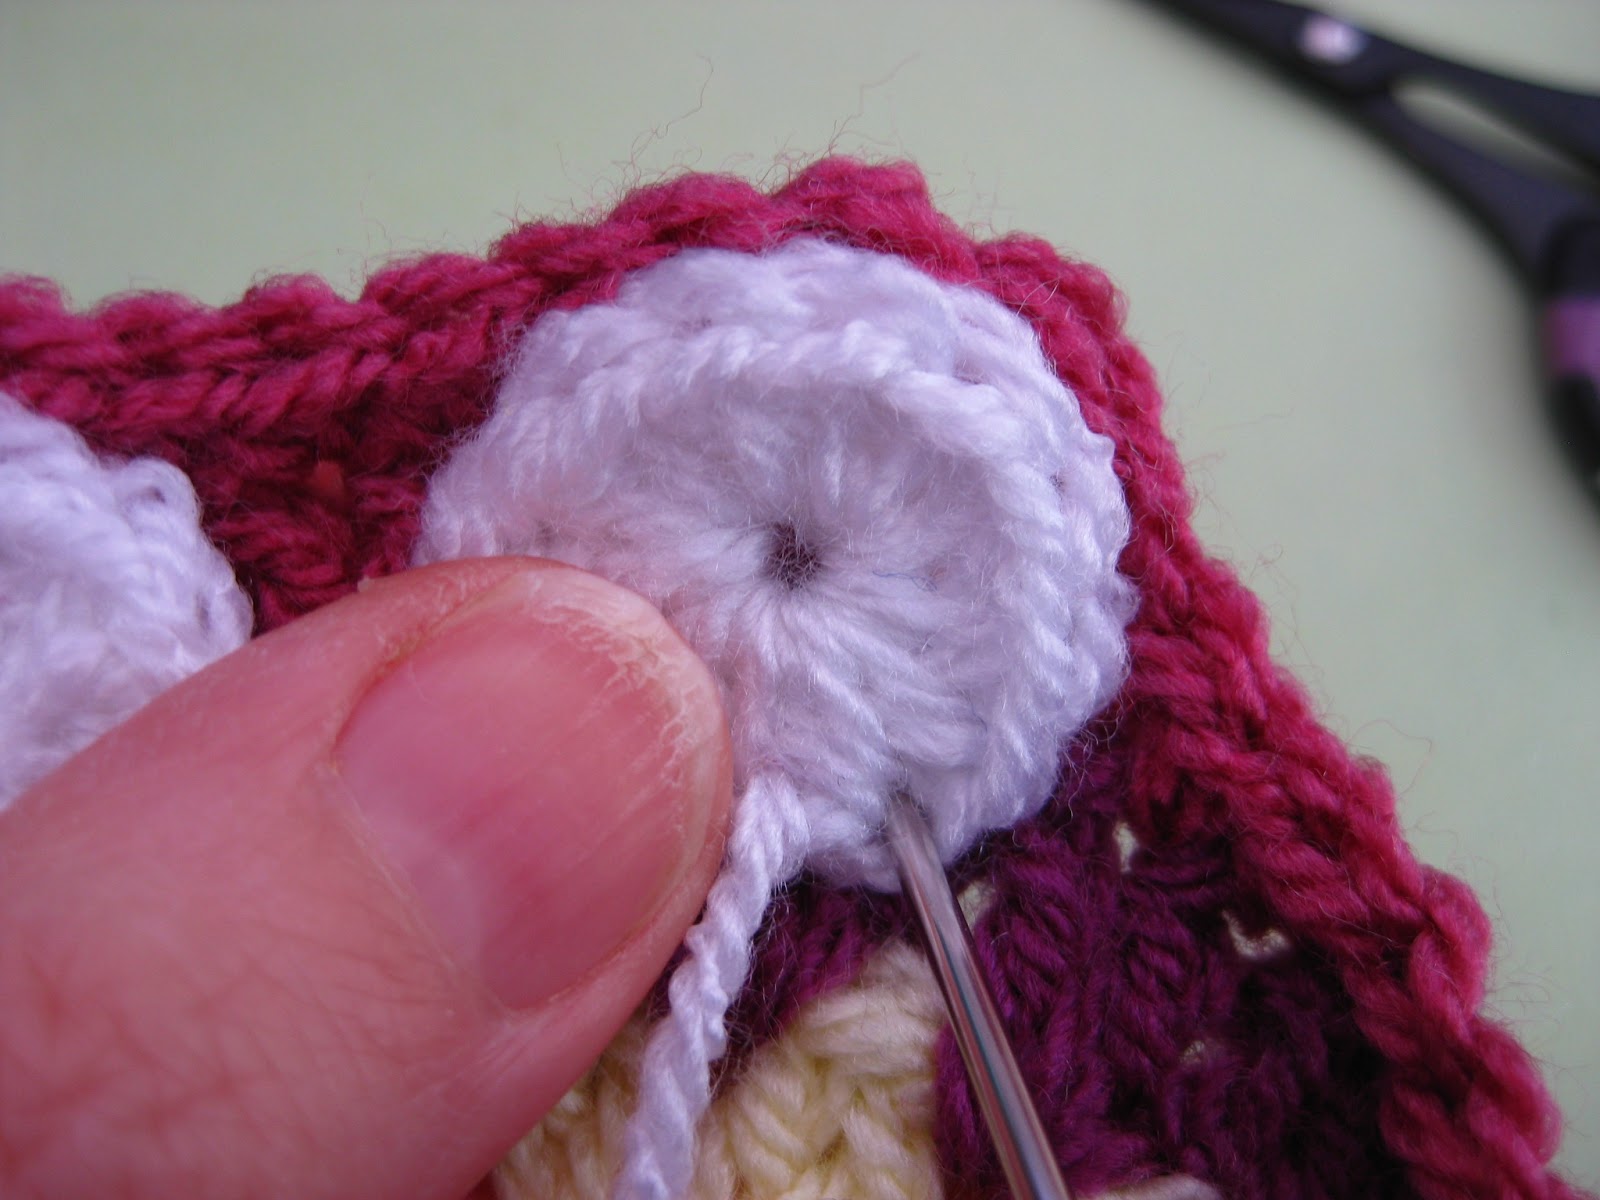
Next onto the eyes. These are easy too.
simply chain 3 then work 11 hdc into the first chain. The picture shows me making the first hdc......
as you add more stitches the chain will open up quite a lot. Don't worry , just hang on to the tail to stop the whole thing coming apart........
Here's what mine looked like when all 11 hdc were made.......
Then you simply pull on the initial yarn tail and a nice neat little "eye" will appear..........
Slip stitch into the the initial chain 3 and fasten off leaving a long chain for joining..........
make a second eye in the same way then pull the centre as tightly closed as possible and securely weave in the centre tail on both eyes.........
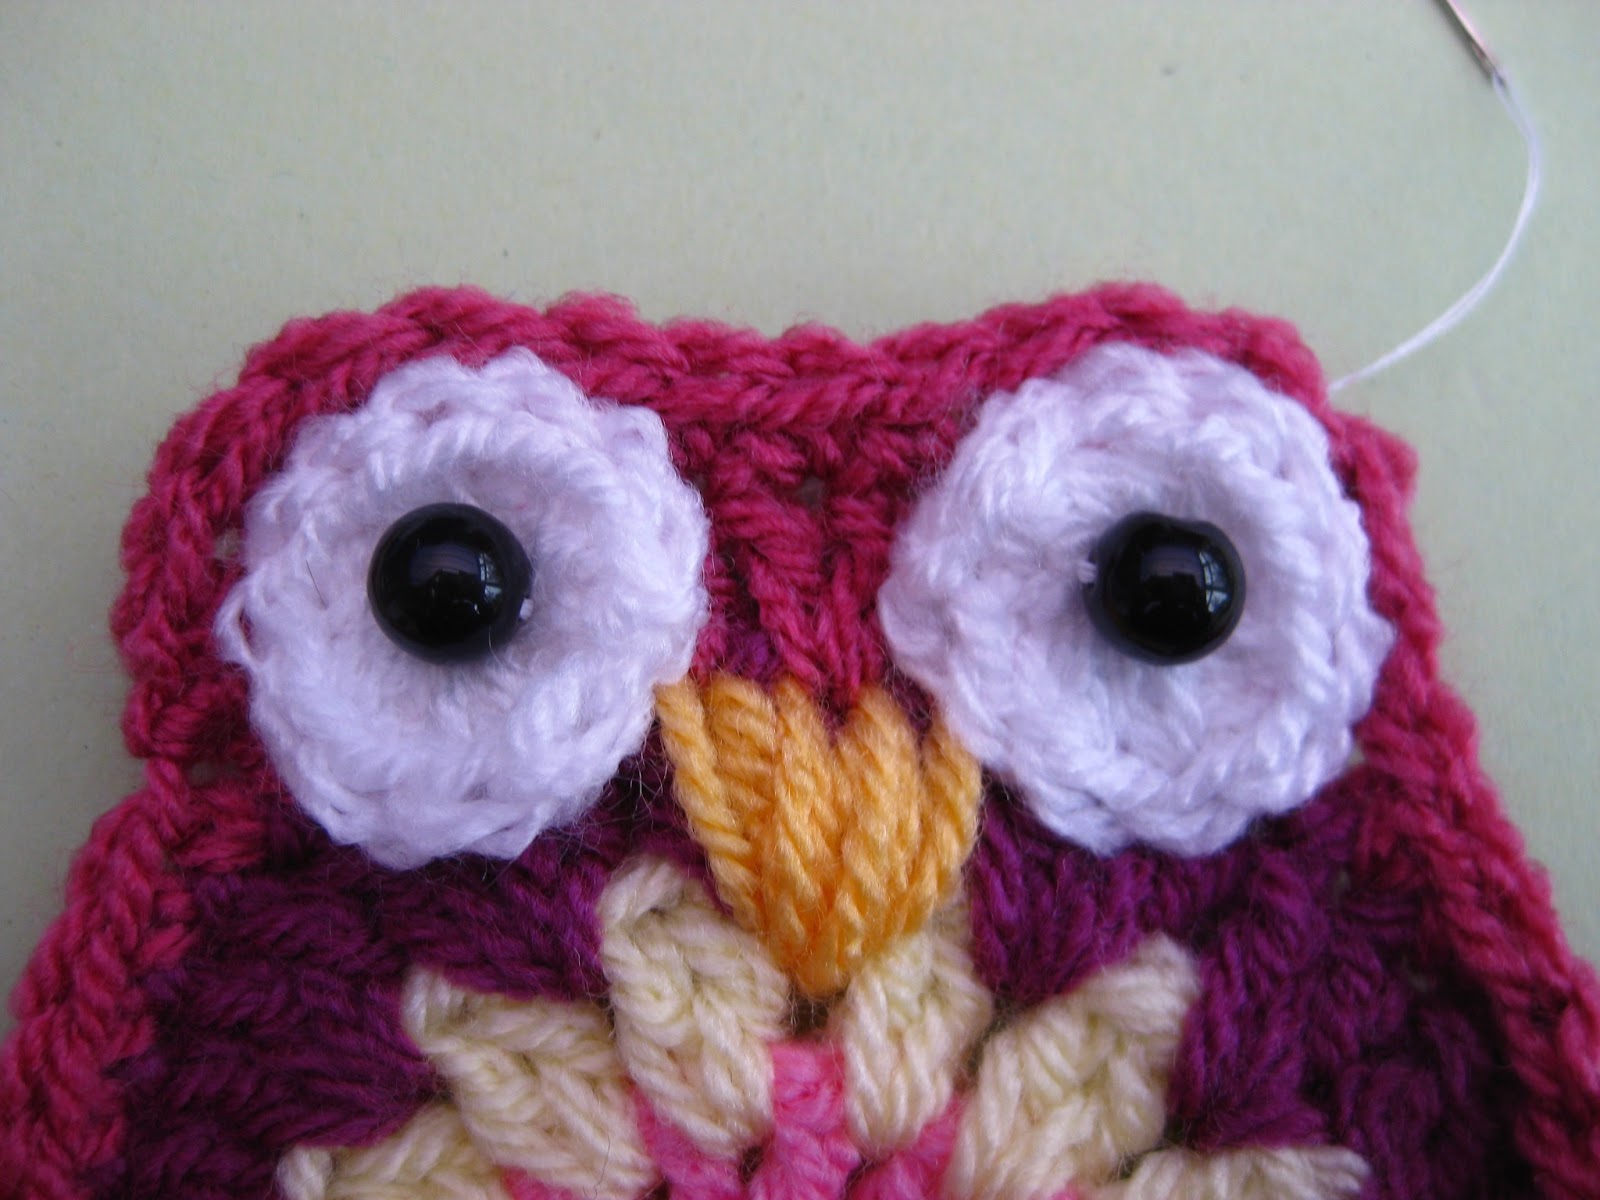
Next sew a beak using contrasting coloured yarn to cover the middle cluster of round 3 in the "head" section of your owl, fasten off and weave in ends...........
Using the long tail of yarn left when making an eye , attach both eyes using a small running stitch around each eye where shown........
For the pupil of the eyes I've used black beads, as it's what I had and they will not be used as toys, but safety eyes would be good too..........
If you are using beads sew them on , using thread , in the centre of each eye.......
There , doesn't that make a difference, suddenly your owl looks much better.........
Next to join the two sides and stuff.
With the wrong sides together ( right sides out ) and using the long tail of yarn sew around your owl, leaving about 5cm open to add stuffing........
Stuff lightly and close the gap.........
Now he's almost finished , but still needs his all important ear tufts........
take some yarn in the same colour as the edge of your owl ( or any colours you like really ) , enough to fold into 4 and have a about 8 inches ( 20 cm ) to work with........
find the middle of your bunch and insert your hook through several stitches in the corner of your owls head. The hook needs to be inserted from the back to the front. Pull through a loop and feed the yarn through this and pull tight........
Repeat at the other corner and your owl should look like this........
Then simply trim the yarn to make his tufts......That's better !
For fuller tufts you could use more strands of yarn. You could also use a mixture of colours as I have done here........
Next onto the wings. These are optional. I think these guys look cute without them too......
But if you like the wing look , here's how its done.
To begin chain 8 then insert your hook in the second chain from the hook ( I've indicated the correct spot with my needle)
and make 1 sc.......
make 1 hdc in each of the next 2 chains, , 1 dc in each of the next 3 chains, at this point you should have 1 chain left
In this final chain make 1 hdc, chain 1 , slip stitch , chain 1 and make 1 more hdc.This make the top of your wing. The chain will have opened up a bit by now like this first picture, but you can pull the tail of yarn and it will close up like I've done in the second picture..........
Now you are working your way down the other side of the initial chain. Make 1 dc in each of the next three stitches ( first picture ) then 1 hdc in each of the next 2 stitches ( second picture )
Slip stitch into the final stitch and then fasten off leaving a long tail to sew the wing onto your owl.
Make a second in the same way. The narrower end is the bottom of the wing.
Here is this cute owl in the snow.....the only other thing I've done in this picture is to add a hanging loop made by chaining 25 and stitching to the centre of his head...........
Awwwwwwwwww, so cute :0)
As usual I hope there are no mistakes in this tutorial. It's taken me quite a while to get right .
But if you do have any problems, need any further explanation or notice any mistakes please let me know.
Enjoy hooking up a little crochet fun lovelies.And please tell me how you get on . I would love to see your creations.
Jacquie x
Edited to Add on the 5th April 2013 :-
Thank you all for the wonderful comments ....it's amazing how popular this pattern is and it's always lovely to see how your owls have turned out so thank you for the links as well.
I've had a few comments asking if it's O.K. to make these to sell......the answer is yes, I'm happy for you to sell owls made from my pattern.
Jacquie x